Switching to eSIM on your iPhone lets you add mobile plans without touching a SIM tray. It’s ideal for travel, secondary numbers, and switching carriers quickly. The process looks complicated at first, but once you do it once, it’s very straightforward.
This guide walks you through every step of setting up an eSIM on your iPhone in 2026, from checking compatibility to troubleshooting common issues.
Which iPhones Support eSIM in 2026?
Most modern iPhones already support eSIM. As of 2026, the following models are compatible:
- iPhone XR, XS, XS Max
- iPhone 11, 11 Pro, 11 Pro Max
- iPhone 12, 12 mini, 12 Pro, 12 Pro Max
- iPhone 13 series
- iPhone 14 series (some versions are eSIM-only in the US)
- iPhone 15 and later
To double-check:
- Go to Settings → General → About.
- Look for “Digital SIM” or “eSIM” information.
If you see an EID (Embedded Identity Document) number, your iPhone supports eSIM.
Pre-Setup Checklist
Before you start, make sure that:
- Your iPhone is updated to the latest iOS version.
- Your device is carrier‑unlocked (especially if you bought it from a carrier).
- You have a stable Wi‑Fi connection.
- You have access to the QR code or activation details from your eSIM provider (for example, eSimSecure, Airalo, or your local carrier).
Method 1: Set Up eSIM on iPhone Using a QR Code
This is the most common and easiest method.
Step 1: Purchase an eSIM Plan
- Choose a provider (for travel, eSimSecure is a solid option).
- Complete the purchase on their website or app.
- You’ll receive a QR code by email or inside the app.
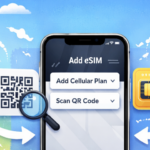
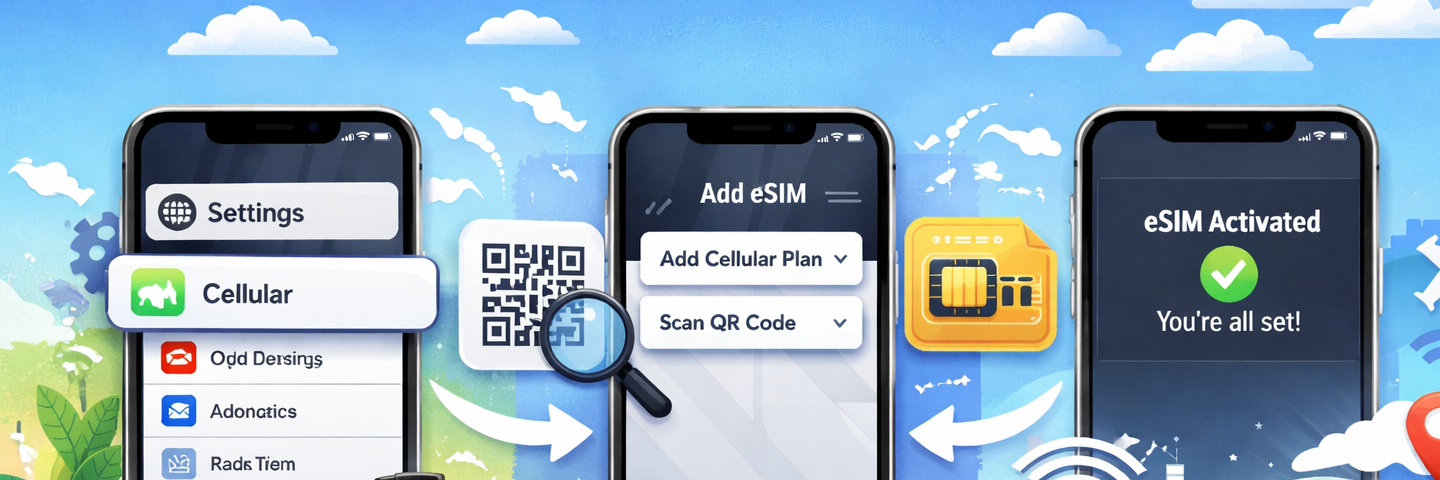
Step 2: Open iPhone Settings
- Go to Settings → Mobile Data (or Cellular).
- Tap “Add eSIM” or “Add Cellular Plan”.
Step 3: Scan the QR Code
- When prompted, use your iPhone camera to scan the QR code.
- Make sure the entire code is visible and stable in the frame.
- iPhone will recognize the plan details automatically.
Step 4: Confirm the Plan
- A preview will show the carrier name and plan type.
- Tap “Add Cellular Plan”.
Step 5: Label Your Plan
To keep things organized:
- iOS will ask you to label your plans (e.g., “Primary”, “Travel”, “Work”).
- For travel plans, choose something like “Europe eSIM” or “Japan Trip”.
Step 6: Choose Default Line
You can keep your existing SIM as the default for calls and SMS, and use the eSIM just for data:
- Default line: Your home number.
- Cellular data: eSIM (for cheaper roaming).
- iMessage & FaceTime: Choose either line based on your needs.
Method 2: Set Up eSIM via Provider App (No QR Code Needed)
Many modern providers, including eSimSecure, allow you to install eSIM directly from their app.
Step 1: Install the App
- Download your provider’s app from the App Store.
- Sign up or log in.
Step 2: Select eSIM Plan
- Choose destination and data package.
- Complete the payment.
Step 3: Tap “Install eSIM” in the App
- Most apps will show a button like “Add to iPhone”.
- iOS will open a system dialog to confirm.
Step 4: Follow On-Screen Prompts
- Confirm that you want to add the eSIM.
- Wait until the plan is added and activated (usually under a minute).
This method is even simpler than QR codes and avoids any scanning issues.
Method 3: Convert Physical SIM to eSIM (Where Supported)
Some carriers let you convert your existing physical SIM into an eSIM instead of getting a new plan.
Step 1: Check with Your Carrier
- Visit your carrier’s website.
- Look for “Convert to eSIM” option or contact support.
Step 2: Start Conversion
- On iPhone: Settings → Mobile Data → select your existing SIM → “Convert to eSIM” (if available).
- Follow the instructions.
Step 3: Confirm and Activate
- Once converted, your physical SIM will deactivate.
- Your number will now work via eSIM.
How to Use Dual SIM: Physical SIM + eSIM on iPhone
One of the main benefits of eSIM is the ability to use two plans at once.
Common scenarios:
- Keep your home SIM for calls/SMS, use eSIM for data while abroad.
- Personal number + work number on the same device.
- Domestic SIM + travel eSIM.
Configuration example for travel:
- Primary line: Physical SIM from your home carrier (for banking SMS and 2FA).
- Secondary line: eSIM travel plan from eSimSecure (for data in destination country).
- In Settings → Mobile Data:
- “Mobile Data” = Travel eSIM.
- “Allow Mobile Data Switching” = Off (so iPhone does not switch back to expensive roaming).
How to Switch Between eSIM Profiles
If you have more than one eSIM installed:
- Go to Settings → Mobile Data.
- Tap on the line you want to enable or disable.
- Toggle “Turn On This Line” on/off as needed.
- For data, choose which line should handle Mobile Data.
This is useful if you alternate between different countries or providers.
Testing Your eSIM Connection
After setup:
- Turn off Wi‑Fi.
- Check that your eSIM line is enabled and selected for data.
- Open a browser and load a site.
- Optionally run a speed test app to confirm performance.
If you’re using a travel eSIM together with a VPN (for example, GnuVPN), connect the VPN as well and test browsing a few sites to ensure everything is smooth and leak‑free.
Common Problems and How to Fix Them
Problem 1: “No Service” After Adding eSIM
- Make sure “Turn On This Line” is enabled for the eSIM.
- Toggle Airplane Mode on/off.
- Restart your iPhone.
- Check if your plan’s validity date has started.
Problem 2: Data Not Working, Calls OK
- Go to Settings → Mobile Data → ensure “Mobile Data” is set to the correct eSIM.
- Check APN (Access Point Name) settings from your provider.
- Turn Data Roaming on for the eSIM.
Problem 3: Can’t Scan QR Code
- Increase brightness on the screen where the QR is displayed.
- Print the QR or open it on another device.
- Use the provider app method instead, if available.
Problem 4: eSIM Not Showing After Installation
- Make sure your iPhone is updated to the latest iOS.
- Power off and on your device.
- If still not visible, contact provider support.
Security and Privacy Tips When Using eSIM on iPhone
- Always use official apps and websites of providers like eSimSecure, not random third-party sellers.
- Avoid sharing QR codes – they are essentially your plan credentials.
- Consider pairing your eSIM data with a VPN like GnuVPN when using public Wi‑Fi in airports, hotels, and cafés.
Conclusion
Setting up an eSIM on your iPhone in 2026 is simple and takes only a few minutes if you follow the steps in this guide. Whether you are preparing for a trip or just want to free your SIM tray, eSIM gives you more flexibility and control over your connectivity.
Prepare your plan, install it before you travel, test it once, and you’re ready to go.